Lighting DIY Cob Building. Safety first! [ELECTRICAL SAFETY ADVICE]

BigSm0

C O B S H O P . N E T
AFN Authorized Vendor
Joined
Apr 7, 2016
Messages
7,290
Reputation
60
Reaction score
30,006
Points
0
Website
cobshop.net
I think as these cobs continue to take over the grow light industry and the amount of DIY options available, doing it yourself is a great option but..... Safety first. Your dealing with electricity and not to scare anyone away but electricity is dangerous.

Hopefully this will be read by most diy'ers here and added to with tips and tricks to keep things spark free.


Below are some great ways to connect wires together. But I noticed that strand wire doesn't make as good of a connection in the push in connectors like these ideal push in connectors.
Or wago's which I do not have a picture of yet.
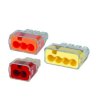
image.jpeg


For strand wire I would recommend crimp caps like this type that can easily be crimped.
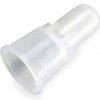
image.jpeg


Also the ideal cob holders use the same type connection as the first photo. Again strand wire is ok but my personal opinion is using solid core wire makes a much tighter connection.
image.jpeg
 
Last edited:
Soldering wire in my opinion is the best solution for connecting wires together. But soldering isn't the easiest option.

One tip or trick I do is if your adding 2 wires to a connector is add heat shrink tubing or zip ties to the 2 wires to hold them together. If one wire is tight and the other isn't the connection of the 2 wires will absolutely help hold them in place.

Now for my builds and where I have strand wire leads coming from a driver what I like to do is heat shrink the driver wire to new solid wire by a crimp connection. Usually the leads are not long enough to make it to the cob anyways and a connection needs to be made. Now you also have a much better wire to make the cob connection.

Don't be afraid to ask questions. It's better to be safe than sorry. I have fried plenty of drivers and had way to many sparks in my cob building but learning from it has brought me to safer solutions.
 
Here's another style connector option that's easy to use and doesn't require soldering. Works with stranded or solid core wire equally well, though solid is still a little easier to work with. Just crimp and go.

IMG_1581.JPG


Safety thread is a good idea. If nothing else, hopefully it can serve as a reminder to DIY'ers to keep safety in mind while doing their build.
For example, another good thing to remember is that heat and sparks can also make fire, so nothing wrong with having a small fire extinguisher handy when powering on your creation for the first time, juuuuust in case. :cools:
 
Here's another style connector option that's easy to use and doesn't require soldering. Works with stranded or solid core wire equally well, though solid is still a little easier to work with. Just crimp and go.

View attachment 622078

Safety thread is a good idea. If nothing else, hopefully it can serve as a reminder to DIY'ers to keep safety in mind while doing their build.
For example, another good thing to remember is that heat and sparks can also make fire, so nothing wrong with having a small fire extinguisher handy when powering on your creation for the first time, juuuuust in case. :cools:


Sure beats bubblegum and painters tape. :smoking:

Speaking of I think the flame defenders are a very worth while investment. $60 to cover a smaller 4x4 tent. Next order I place will be for 3 of these bad boys. Automatically releases the suppression material at a certain room temp which handles any A,B or C rated fire.
 
Wago's are great pop22.

Something else I think worth adding is the actual part compatibility. If anyone is doubting a specific setup there are plenty of knowledgeable people here on afn that are more than willing to help.
 
Something I always do when running wire through metal is after drilling the size hole I need I take a larger bit and just sort of bore the hole a little. This helps with shaving down the sharp edge to prevent the metal from chafing the wire.
Can kinda see this in the 2 outer holes. The center ones are for the cobs and not needed.

image.jpeg

@HotBunz I didn't see a copyright symbol next to your recent DIY photo so I jacked it for the love and safety of diy'ers on afn. Looks like we shared the same ideas in saving the wire protectors and using them to help protect the wire in the heat sink penetrations.
image.jpeg
 
I'd be interested in learning about how much voltage, amperage (watts), etc. these COB fixtures involve, and how heavy gauge wire should be used.

What is the basic common layout of these DIY COB fixtures? How many and what type of components/parts need to be wired and assembled?

To build one, even working from a kit, what minimal support equipment/infrastructure is needed - multi-meter, IR thermometer, adjustable power supplies/variacs, soldering station, electric drill, a vice, files, other metal working tools, a shop or work area, etc.? Is building a COB within reach of someone lacking a work area, having not much beyond soldering capability, a multi-meter, and having only hand tools?
 
I have no work area. I have a "bench top" I made that sets over top of our chest freezer. That and what tools are in my toolboxes are it......

Minimum tools depends on if your building from scratch or kit building. Whether you just want to build a light and get growing or if the light itself is the important project to you, testing experimenting, tweaking them for more performance. Minimum, everyone should have a set of good screwdrivers ( no, not the $.99 ones from Walmart lol ), a digital multimeter, a soldering tool, preferable a soldering station as you'll 30 - 45 watts and it will have accessories you need anyway, a stand for the soldering pencil, a well with a brass sponge, etc, a wire stripping tool ( a pocket knife will work...... you WILL cut your fingers...... ), solder, flux, sandpaper, tape measure, cutting pliers, electrical tape, heatshrink tubing, and wire connectors/wire terminals. I'm sure I left something out but with these items you can get started.

different folks will have different goals. a one size fits all list won't work, but everyone will need the basics.

And SAFETY first and always!

I'd be interested in learning about how much voltage, amperage (watts), etc. these COB fixtures involve, and how heavy gauge wire should be used.

What is the basic common layout of these DIY COB fixtures? How many and what type of components/parts need to be wired and assembled?

To build one, even working from a kit, what minimal support equipment/infrastructure is needed - multi-meter, IR thermometer, adjustable power supplies/variacs, soldering station, electric drill, a vice, files, other metal working tools, a shop or work area, etc.? Is building a COB within reach of someone lacking a work area, having not much beyond soldering capability, a multi-meter, and having only hand tools?
 
Back
Top