Nelson
R.I.P. Gone, but not forgotten.
Well I almost bought a made up tote kit. The members all shamed me into building my own so I have. My bid bubbly tank has a problem all the babies are right in with the adults and it means that they start up under flowering nuits and the lights are too high to give them a good jump at life from the start. The solution is simply to give them a place of there own to start up on there own and grow for the first four or five weeks. It also means that I won't have to deal with any males that hide in the females and accidently seed up my females. Nobody wants seeds unexpectantly in their smoking pot. I was thinking of making my main bubbly tank a femmed seed only unit but this way I can still take regular seeds cause they will not ever see the bubbly tank.
I have 69 holes in my bubbly tank and I was thinking about 24 start up holes would be good but I might expand this to 36 if 24 is too few to keep the big tank full. The big tank uses 3 1/2 inch net pots so the start up tanks need to be the same so I can just lift the pots from the start up tanks and drop them in the main tank to flower up.
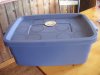
I went out to choose a tote for the job and decided that the Rubbermaid Poughneck model 2214 was the one for me. It is 24X16X8.75".
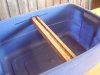
The first thing had to do was checkout how much thing bulged when full of water. I filled it up and the sides did bulge out enough so that the top didn't fit on well. I had to add a piece of wood to stiffen it up and also give the top a little support. This ended up being a 14 3/8" 1X2" piece of hardwood I had lying around. I drilled the sides of the tote and mounted the wood piece with 4 number 10 1 1/2 inch wood screws with some silicone to make sure the tank woule not leak where the screws went through.
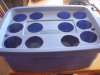
The next test was to lay out the top. It turns out that the net pots fit best into a 3 5/16 hole. I cut a top off of a vegtable can down to that size by grinding the edge down on a bench grinder and them gave it a final sanding with 150 grit paper so the edge was smooth.
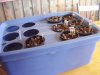
I drew my circles with a black sharpie onto the top and was pleased to find the top would hold 12 of the 3 1/2 net pots. I cut the holes with Diston dial type hole saw. If you don't have one you can just use a box cutter the plastic is not too difficult to cut. I cut two 1 inch holes at either end to accomodate the plastic air line. Icut two in case I wanted to add a water circulation pump.
With the top finished I added a tap to the bottom and used rubber O rings and more silicone for a waterproof fit.
I am going out to day to try and find some bubble rocks. If I can't find some I will put in a soaker hose.
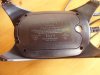
I bought a Walmart silent pump for acquariums. I bought the biggest one they had but the outlet air flow is not great. I think a better quality air pump from a hydro mail order place would be way better.
Good luck with your project if you build one I am sure you can do better than I did and feel free to add your two cents on this post.
I have 69 holes in my bubbly tank and I was thinking about 24 start up holes would be good but I might expand this to 36 if 24 is too few to keep the big tank full. The big tank uses 3 1/2 inch net pots so the start up tanks need to be the same so I can just lift the pots from the start up tanks and drop them in the main tank to flower up.
I went out to choose a tote for the job and decided that the Rubbermaid Poughneck model 2214 was the one for me. It is 24X16X8.75".
The first thing had to do was checkout how much thing bulged when full of water. I filled it up and the sides did bulge out enough so that the top didn't fit on well. I had to add a piece of wood to stiffen it up and also give the top a little support. This ended up being a 14 3/8" 1X2" piece of hardwood I had lying around. I drilled the sides of the tote and mounted the wood piece with 4 number 10 1 1/2 inch wood screws with some silicone to make sure the tank woule not leak where the screws went through.
The next test was to lay out the top. It turns out that the net pots fit best into a 3 5/16 hole. I cut a top off of a vegtable can down to that size by grinding the edge down on a bench grinder and them gave it a final sanding with 150 grit paper so the edge was smooth.
I drew my circles with a black sharpie onto the top and was pleased to find the top would hold 12 of the 3 1/2 net pots. I cut the holes with Diston dial type hole saw. If you don't have one you can just use a box cutter the plastic is not too difficult to cut. I cut two 1 inch holes at either end to accomodate the plastic air line. Icut two in case I wanted to add a water circulation pump.
With the top finished I added a tap to the bottom and used rubber O rings and more silicone for a waterproof fit.
I am going out to day to try and find some bubble rocks. If I can't find some I will put in a soaker hose.
I bought a Walmart silent pump for acquariums. I bought the biggest one they had but the outlet air flow is not great. I think a better quality air pump from a hydro mail order place would be way better.
Good luck with your project if you build one I am sure you can do better than I did and feel free to add your two cents on this post.