Indoor Anthro's Perpetual Science Experiment, Veganic, Multi, LED+CFL, Journal + Trials.

Anthropolis

Canna Jedi in training.
Joined
Aug 8, 2014
Messages
2,791
Reputation
0
Reaction score
2,526
Points
0
Hello friends, finally got around to making a journal for my ongoing science project lol. I hoped to finish up and clear out the Smurfberry experiments by now, but they're taking forever so yeah. Won't be focusing on those, if interested I'll still be updating those here: https://www.autoflower.org/f5/anthros-supercropping-tie-down-experiment-fabric-pot-mod-35843-2.html

Ok, so if you've been playing along at home, I'm on Round 3 now. Here's a summary of mostly fails thus far lol:
Round 1: 10 smurfs, several Chernobyl x da Purps. All killed due to various newbie mistakes and using Miracle Gro products, except 1 dwarf Smurfberry lived and provided a couple grams. At this point I decided to go full organic, but also vegan and follow Kosher as close as possible. This mostly just means not using the popular bone meal, blood meal, and bat guano. Round 2: getting better, 10 smurfberry again and a couple random Chernobyl x Purp thrown outside. 3 smurfs killed, 1 Cherple killed. 3 Smurfberry successfully completed normally, 4 Smurfs used experimental tie-down successfully (see above link), 2 Cherple outdoor just chopped early, and 1 White Widow did okay.

Now I've ponied up the money for nice name brand genetics. Round 3 has: 1 Sweet Seeds Red Poison (killed 2 seeds trying a new germination method), 2 T.H. Seeds Bubblegum Auto (killed 3 seeds trying new germ method), 2 each of Seedsman freebies Pink Lady autos and Grapefruit Punch autos, and 1 Blueberry auto from ILGM.

Tent: 2x4x5 Lighthouse Hydro, "Pioneer" 450w LED, 6x 23w CFL mixed soft and daylight, 2x 17w 24" fluorescent tubes side lighting, 2x UVB 10.0 (10w and a 26w). Ventech 6" inline fan and carbon filter. 4" duct fan intake. Viagrow brand fabric 3gal pots. Side fan, sensors, and decorative pink flamingo lol.

Soil is my own organic mix of: Premier peat, Miracle Grow Organic Choice, earthworm castings, cow humus compost, mushroom compost, kelp meal, cottonseed meal, azomite rock, gypsum, greensand, perlite, vermiculite, water crystals, some crushed oyster shells, and a dash of pure zinc, boron, potassium silicate, iron chelate, and lignite. Occasionally feeding with General Organics GO box minus the squid.

Alright I think we're all caught up now lol, happy picture time:
IMG_20140915_170629.jpg
My beloved Sweet Seeds Red Poison
--
IMG_20140915_170649.jpg
TH Seeds Bubblegum Auto
--
IMG_20140915_170732.jpg
Blueberry auto
--
IMG_20140915_170752.jpg
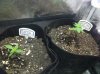
The freebie Pink Ladies
--
IMG_20140915_170717.jpg
Baby bubblegum recently started
--
IMG_20140915_171442.jpg
Micro terra cotta pot experiment with a Cherple, had a Blueberry but it failed to start.

The Grapefruit Punch picture wouldn't attach properly, but they're seedlings off to the side. On the way are 3 Afghan Kush Ryder and a Sweet Seeds Fast Bud #2, for when the Smurfs finish and clear out. It's about to get really packed in there! The new plants are already doing a ton better than the smurfs did. Thanks for stopping by!
 

Attachments

  • IMG_20140915_170556.jpg
    IMG_20140915_170556.jpg
    437.8 KB · Views: 65
Next experiment destined to fail lol: cloning a SS Red Poison and THS Bubblegum. My clone attempts keep failing, so I got some Rapid Rooters and am following Xlr8's instructions from another blog. So far several attempts with rockwool and soil, no luck. So here we go. Got a little container to retain the humidity, sterile razor, 45 degree cut at a node, dipped in Clonex, and put into the Rapid Rooters soaked in Clonex water. The end goal is to be able to reverse one or both with some Colloidal Silver spray to make a cross :)
IMG_20140916_094906.jpg
 
The cuttings are looking really good, for once I think they might survive and root! No signs of rooting or new growth or anything, but they have not wilted at all which is a first for me lol. I have them under my little diy led box, with clear plastic wrap over the container to keep in humidity and lets full light in. Spraying with rainwater several times a day.

Round 3 in the tent is really going strong! The Red Poison is just amazingly healthy looking:
IMG_20140917_091336.jpg IMG_20140917_091351.jpg
Side branching is very fast and strong.
-
Bubblegum auto is starting to flower :)
IMG_20140917_091405.jpg
-
IMG_20140917_091433.jpg
Blueberry starting to preflower.
-
IMG_20140917_091438.jpg
Pink Ladies looking healthy, one is much bigger. Short one has super tight node spacing.
-
IMG_20140917_091447.jpg
Grapefruit Punch are throwing out new leaves :) these are supposed to be almost pure Sativa so they could get some wild growth later. I'm not really a fan of Sativa dominant for my own medicine, but there's a special lady in my heart that seems to like more Sati dom, so these are really for her ;) Waiting for a little more growth, then they get my mega topdressing and decorative rocks.
-
IMG_20140917_095736.jpg
And finally the Round 2 Smurfberry is chopped and hung, tent floor is open for these young ones now :) Might have room to start a couple of the Afghan Kush Ryder's when they arrive. Maybe not tho, the RP and Bubblegum are bushing out past the pots lol! I just hate having empty space. Thanks for stopping by friends!
 
Cuttings still looking healthy, which for me is a miracle lol. No roots visible yet but no wilting either.
IMG_20140918_0739142.jpg
Some new arrivals now soaking! Thought I ordered a 3x of the Afghan Kush Ryder, but they must have processed my earlier shopping cart instead. That's ok, I'm happy with:
1x WoS Afghan Kush Ryder
1x HSO Blue Dream auto
1x Sweet Seeds Fast Bud #2
All soaking now. Couple neato photo freebies for springtime: a Super Silver Haze fem and a couple Sleestack regs.
IMG_20140919_132102.jpg
 
Couple of quick pics: the Red Poison and Bubblegum flower sites are forming up very nicely:
SS RP:
IMG_20140919_181944.jpg
THS BBG:
IMG_20140919_181951.jpg
So far they've been the vision of what a HEALTHY plant should look like :)
 
How to: mid-grow mycorrhizae blast and topsoil compaction fix! Here's a couple Anthro fixes for ya, not saying it's the right or perfect way, just what I have come up with :)

Once or twice during a grow, I think it helps to turbocharge the mycorrhizae and beneficial bacteria in the soil. This may not matter much if you're using hardcore chems and ferts, but for organic growing and garden vegetable growing, the life in the soil maters a lot. Remember the idea is to feed the soil, and the soil feeds the plant. So let's get out our goodies and inoculate the soil some more. (I do use a good bit of myco at planting time, so this is a bonus inoculation)

I take a liter bottle of rainwater and put in two teaspoons of earthworm castings. This is to help jumpstart the myco and bacteria, cow compost could work ok too.
IMG_20140920_143248.jpg
Now I've got a pretty good selection of myco/bacto goodies, but just use what you have. Not saying that this is the best or only way :)

Put in a teaspoon or so of the Mike O'Rizey brand mycorrhizae:
IMG_20140920_143340.jpg
Put in a teaspoon of Great White myco/bacto and some of their Jellyfish root innoculant. It helps to have a piece of paper or cardstock folded :)
IMG_20140920_143550.jpg
Now I also used 2ml/2cc's of General Organics Bio Root just because I had some :) Ugh I still shiver and hate needles, even if it's just for measuring lol.

IMG_20140920_143651.jpg
Now of course the mycorrhizae and bacteria need something to feed on! Of course you probably know that this is mostly the reason we use molasses heh! For this I'm using about 2 teaspoons of unsulfered molasses ("treacle" for my UK friends).
IMG_20140920_143831.jpg
As you can see, I'm not measuring any of these exactly, aside from the Bio Root. Now time to shake it like a Polaroid picture haha!
IMG_20140920_143948.jpg
Then I like to leave it to "incubate" for a couple hours. During this time the goodie are coming to life and feasting on the sugars. Don't leave it overnight or you'll find the bottle about to explode from pressure! The myco/bacto release helpful gasses as they feast, just like yeast and sugar.
And that's that! If ya have a bunch of plants, or if it's thirsty watering time, then a 2 liter bottle mix might be better for you. Don't save the unused portion, it'll build up gas in the bottle lol. Put it in your soil mix or garden.
++++++++++

One big issue I've found recently, perhaps because of the fabric pots or my watering style, is bad soil compaction near the top. I've read other users have this problem sometimes too. This is a problem because it restricts gas exchange with the roots / soil life, and makes watering more difficult. So get out some big kitchen forks!
IMG_20140920_154036.jpg
Ya want to do this gently so as not to rip any roots! Luckily only about the top half inch was compacted, so I didn't get to any roots. But if left alone, an inch or a little more can be compacted by the end of the grow! Carefully just "rake" and stab the soil, paying attention to any clumps or hard spots. It should break up pretty easily, but if yours is compacted badly, you may need to use your fingers too. If yours is in realllllly bad shape, it's not too late to add some perlite and/or vermiculite to the topsoil and blend it in, using the fork and fingers.
--
Ok that's it for this post, it's too long already lol. Good luck! Get that good bacteria and mycorrhizae into your soil!
 
Good news today! One clone has good roots and has been potted up, and a couple seedlings I thought I killed are still alive!! Pics:
IMG_20140922_110050.jpg
Roots in three places! Decided to pot it immediately so the roots will have something to grow into and less fighting with them later when bigger. That's the TH Seeds Bubblegum Auto, the SS Red Poison is slower and no roots poking out yet, so she's still in the humidity bin.
-
I brought it outside to pot it, and began wilting quickly (mistake!), so I decided to rig up a DIY humidity cover using skewers and plastic wrap, with a rubber band holding it tight. Will give it a couple days to settle and then begin acclimating it to normal humidity.
IMG_20140922_112601.jpg
Hope the brief wilting didn't screw it up too bad :/
-
The incubation chamber is an old Dell that I stripped out, painted white inside, kept the power and fan(s), and super rigged up an awesome led panel (3 watters from ebay and heatsinks) and some extra leds leftovers from my car customizations.
Crowded at the moment lol. Has my micro pot seedling, the Red Poison still in the humidity bin, and now the potted up Bubblegum clone with her diy tent hehe :)
IMG_20140922_112736.jpg
Took like two days, lots of soldering, wiring, and those leds aren't cheap, to make that led panel haha! That's it for now. Update from main tent later :) thanks for stopping by friends!
 
More good news today! The SS Red Poison is starting to throw out pink/purple pistils! Woohoo! She's also forming some nice tiger stripes! Pics:
IMG_20140922_133141.jpg
Hmmm, it looks wayyy more red/pink/purp in person... No, the leds are off :)
IMG_20140922_133909.jpg
Tiggy Tied Hyper Tiger Stripes hahaa.
-
Some really great news, two of the seeds I thought I had killed are doing okay, just screwed em up a bit trying to germinate directly in peat. Carefully replanted and hoped for the best :) So, one more Red Poison and one more Bubblegum survived I think :)
IMG_20140922_133805.jpg.+IMG_20140922_133815.jpg
-
Dang this tent is looking SOOOOO much better than previous two trials :)
IMG_20140922_1336531.jpg
Anthro much happier than last round :) maybe I won't be like this at harvest time again:
252177_10151169770052471_1500714359_n.jpg
Lmao!
 
Back
Top