DIY Ultra Stealth PC Grow Box With Led and Carbon Filter

Joined
Jul 27, 2017
Messages
65
Reputation
0
Reaction score
103
Points
0
Age
53
Ok Guys here it is, my diy stealth pc grow box project. Ok so i will be posting This project in steps as i go through the process, i already have it planned out but im going to post as i go along just so i do not forget any important steps.

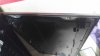
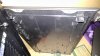
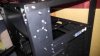
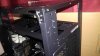
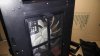
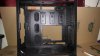
So im using a Corsair Carbide 600q pc case, i chose this one because it is a full tower, it is black, has sound dampening panels. built in dust filters and a compartment on the top to store hard drives and the power supply which will contain all the electronics.
BTW i am not an electrician nor do i claim to be knowledgeable in the field, builder assumes all responsibilities.
I also recommend plugging the pc to a GFCI outlet and surge protector.
Oh yeah
the reason i decided to make this build is because i was looking around at turn key systems such as other pc or speaker boxes and i could not find one that had every feature i wanted, light sound(hopefully) and smell proof, im not talking down to many of the products out there, i just dont want to pay for a box thats using lights that im not going or to modify them with extra filters and other things. So i figure i might as well do it my self, this is not going to be a cheap project, the case it self cost 150 bucks, although i bought mine in a damaged box from amazon warehouse deals for 110. it just has a unnoticable dent on the back side.
This is going to take me a while to finish this project, as im doing this log as i build the box, and you know what, i may just fail and look like an idiot. and as i write this and stare at the empty box, i just came up with a new idea for a light trap, so that part may take me a couple days to figure out how im going to do it.
So grab some popcorn and take a seat and come on this ride to build the ultimate (soil, @ mr. sparkle has the best soilless box i have ever seen) stealth pc grow box.
 
Step 1 gut the box
ok so as i was gathering all the parts to fit into this box i decided to take a look inside to help me plan my build so i dont have any pictures with the top and front panels on, sorry. you can google a 600q and see the pics.
so what you want to take th top and front panels off. be sure to remove two screws on the front at the top to get the top panel off. just pull it off, not too hard because it may break
.
596995-96ba5dabc786631d2a71c7b77260f3e0.jpg
596996-679ab1a4113fd16c869f7908e6e1bd46.jpg

there are some images of the screw holes on the panel
next you want to remove all 8 thumb screws on the back, and remove the square thing, thats the power supply holder thing, you will need that again later, and you need to remove the side panels.
597000-38d069cd4564800a688007e4a240e921.jpg
oh yeah and remove the cardboard boxes, one is some screws ant the other is another 140mm fan. thats the image of the thumb screws holding the square thingy.
next you want to remove that side cover and the two drive bays
597001-06a1e1a2b80294a4830a3b9b963de9b7.jpg

turn it to the side and remove the 4 screws and the bays should slide out
.
597004-452d2ece2717725e54effa5990f57412.jpg

now go to the back and remove two screws and just yank that side panel cover off.
before
597004-452d2ece2717725e54effa5990f57412.jpg
597005-b579bd492cb68c5b7d1e6fc6929c429d.jpg
after
remove the two fans and cut the ties that hold the cables and pul them to the other side, do not cut the wires you will need at least two of em
oh yeah this is the front removable dust filter, i was going to use this for an passive intake (with light trap) but i dont think i will use it, anyway there is a picture of it and one of the two fans
597006-42cda3e6934b60c4c382e2db1bc12924.jpg

ok so when your done this is how it should look
.
597007-4a9484deab8faf783518466489d521e5.jpg

ok guys thats it for day one. thanks for tagging along, and g'night and good morning to some, peace,
 

Attachments

  • 20170823_194739.jpg
    20170823_194739.jpg
    59.9 KB · Views: 1,003
  • 20170823_194756.jpg
    20170823_194756.jpg
    93.7 KB · Views: 895
  • 20170823_194739.jpg
    20170823_194739.jpg
    59.9 KB · Views: 782
  • 20170823_194756.jpg
    20170823_194756.jpg
    93.7 KB · Views: 820
  • 20170823_194802.jpg
    20170823_194802.jpg
    54.3 KB · Views: 836
  • 20170823_194924.jpg
    20170823_194924.jpg
    103.3 KB · Views: 751
  • 20170823_194954.jpg
    20170823_194954.jpg
    83.3 KB · Views: 789
  • 20170823_195311.jpg
    20170823_195311.jpg
    61.1 KB · Views: 924
  • 20170823_195550.jpg
    20170823_195550.jpg
    81.9 KB · Views: 931
  • 20170823_195618.jpg
    20170823_195618.jpg
    90.5 KB · Views: 1,360
  • 20170823_202148.jpg
    20170823_202148.jpg
    95.1 KB · Views: 1,287
This is my carbon filter, I got a 103 cfm fan 80mm from diy of and an 80mm duct. I also purchased 2 rubber gaskets to go on both sides of the fan.
I dismantled a power supply and attached the fan at the rear.
Soldered 3 wires to the insidw of the plug.
Filled a panty hose with carbon and attached a mesh handled filter to a pen cup and taped it to the duct. It was a little to big so its a fail and I have to create a new filter. Just posting because its been a while sonce I updated.
Its a fail because it was way too big and my light would have to be placed on the end and not the center.
e7e6784618e64ed05ca9fa82d42d070b.jpg
8f0ee482a52e4f2901d516b89753df8c.jpg
8e850ffb36498cb21406df6e5e8ba257.jpg
da17f0e1de4be3f1971bfe00c3103694.jpg
53bb4cb463f1c824d3da6280f477c607.jpg
3f9ae0ed7b8c75b4b01f77982b88eea3.jpg
a0d6f3fd9ec66d1c754fe843c961ffff.jpg
a802b89fc90b137d1b51f36651b4be13.jpg
 
So after the failed attempt at makimg a scrubber I Dr used to go ahead and hook the light up.
I'm using a full spectrum(purple) self driven led cob I found for 5.99. Its 50w and it connects directly to an ad outlet. There is no need for a driver.
I soldered 2 wires to it and used kapton tape to secure it to the pc heatsink and fan.
I'm using a arctic brand cooler that uses a fan with fluid dynamic bearing, which is the top of the line when it comes to pc fans, its super quiet and longest lasting fan type. The setup cost 12 bucks on Amazon and it even has thermal paste on the heatsink so that saved me a few bucks.
The case already had an open spot in the center of that top compartment so there was no cuttimg necessary. I used zip ties to secure it. I was a little skeptical at first thinking that it may vibrate causing a rattlimg noise, with the fan at full speed it is completely silent.
I have the cob wired to an led dimmer, which is basically a 500k potentiometer attached to a circuit board and heatsink. From there it is attached to a spare cord I had laying around.
I secured the dimmer to the case with kapton tape.

From there I removed an ssd hard drive bay and screwed a fan speed controller and hooked it up to the exhaust fan because that sucker is loud at full speed, but then what else wpuld you expect from a 103cfm 80mm fan.
I bought 2 of those mesh filter things with the handle, cut the handle off of both. Filled a pantyhose with carbon and swandwhiched between the two filter things and taped it together to form a ball. The key to doing this is to fill the panty hose up to where it is bigger than the area between the ball halves so when you squeeze them together there is a gap between the two peices, that way its packed tight. I taped it to the duct and now I have the light and filter set up.
Next step is to create the light trap, install a fan for circulation and seal the thing up.
fc84b20a3cdd5bdff8a7fd5944c0791c.jpg
88c135dc17abed7f5a50426f508781ec.jpg
c9cd2658913c24b983f46c0ab5339031.jpg
c3dc999acc943f0af600c2fbf2d5605c.jpg
ee4c9ad2e531e04c56b11b65a44f8a52.jpg
43bd8c40ed022381f5fa570b6d8d67da.jpg
a4c89fcb7d0d56b571b6700da54f99c1.jpg
eef8b7748494bb7d5c578c9d7fdce9a2.jpg
3dd3b5ae0552349b58510f3eba0d1c00.jpg
 
ok so i want this to look like a real computer so i grab a pos motherboard with the i/o shield
i cut off the back ports and attach it to the i/o shield and tape it to the case to block all the light.
next step is to seal all the tiny holes and make the box light proof
i use electrical tape and tape all the holes from the inside, sticky side out. i know that dust will probably collect on the tape but thats ok because i figure it will just make the computer look like a used dusty computer.
i also begin work on the light trap. the case has a magnetic dust filter on the bottom so this is where i decide to make the trap
i tape up the edges of the ventilation holes to bake the intake smaller then i glue chopped up pencils in random patterns to the bottom, the idea is that light can only go in straight lines but air can go around corners. this ends up working great.
right now im swamped at work due to the hurricane, working 12-16 hours a day so this project is taking me way too long, on the 28th my seedling pop over ground so at this point im in a hurry.
i turn everything on and test for light leaks and go ahead and give the filter a test run.
it works good, not great as i can still smell some of the smoke from the incense, we will have to see how it works in a real grow.
 

Attachments

  • 20170829_200432.jpg
    20170829_200432.jpg
    94.1 KB · Views: 553
  • 20170829_212659.jpg
    20170829_212659.jpg
    93.9 KB · Views: 525
  • 20170829_212707.jpg
    20170829_212707.jpg
    78.3 KB · Views: 501
  • 20170829_212715.jpg
    20170829_212715.jpg
    118.9 KB · Views: 567
  • 20170829_214557.jpg
    20170829_214557.jpg
    91.9 KB · Views: 529
now its time to finish the project
now that everything is sealed up its time to finish the light trap
i use a clip board made from a wood/cardboard blend, i cut it to size leaving a gap for the air around the edges, i have to use two pieces so i tape and seal the gap between the boards.
next i glue the reflective material to the sides and cover, i also cut small slits in the sheets so i can attach magnetic hooks to the case which will hold up my netting.
FIN
peace out
ps i wanted to thank all the people who help made this possible and for the inspiration @arty zan for using a cob and filter and @Mr. Sparkle for his sick ass cases giving me inspiration to build my own.
i also wanted to thank all the people from the past for helping me develop into a decent bud grower.
and to all the people at the cod diy forum helping me out with the lighting
 

Attachments

  • 20170830_152828.jpg
    20170830_152828.jpg
    36.2 KB · Views: 399
  • 20170830_152546.jpg
    20170830_152546.jpg
    65.2 KB · Views: 340
  • 20170830_152546.jpg
    20170830_152546.jpg
    65.2 KB · Views: 348
  • 20170830_152552.jpg
    20170830_152552.jpg
    75.3 KB · Views: 377
  • 20170830_181623.jpg
    20170830_181623.jpg
    134.9 KB · Views: 340
  • 20170830_182505.jpg
    20170830_182505.jpg
    151 KB · Views: 378
  • 20170830_181626.jpg
    20170830_181626.jpg
    168.6 KB · Views: 382
  • 20170830_152552.jpg
    20170830_152552.jpg
    75.3 KB · Views: 373
  • 20170830_152828.jpg
    20170830_152828.jpg
    36.2 KB · Views: 372
  • 20170830_181623.jpg
    20170830_181623.jpg
    134.9 KB · Views: 359
  • 20170830_181626.jpg
    20170830_181626.jpg
    168.6 KB · Views: 342
  • 20170830_182505.jpg
    20170830_182505.jpg
    151 KB · Views: 360
Quick update on the filter performance.
Fan filter combo works great at high speeds,but its loud, crazy loud but because I'm going for the stealth effect I had to take the carbon out and replaced it with a dark cloth to keep it light proof. At silent speeds k was experiencing 90-100 degrees.
After some research I concluded that ona gel doea not tamper with buds flavor or potency so I'm going to have to go that route.I have experience with ona and I have never experienced bad taste or smell except when I was spooning gel on to a plate by the exhaust and I dropped a crystal on a bud, in my experience only direct contact ruins your bud. Of course I had always placed my gel right by the exhaust vent. And never close to the planta
In the area by the timer I'm able to place a cheap gel crystal air freshener as it dries up I will fill it with ona liquid and dilute it with water, usually 1:1 ratio but I think I'm going to try 1 part ona 2 parts water.
Anyway ill put up pics of the setup and post a link to my grow whenever I get the chance.
Peace.
 
Hey dude nice box!

Are you able to answer a question about it please?

Thanks


Sent from my iPhone using Tapatalk
 
Back
Top