Hey all!
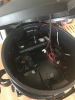
New here, and I dropped an intro over in the newbie section yesterday. I'm about to start my first grow in a space bucket for veg purposes. I wanted to share my build of the bucket, and also the grow itself. Since the build is kinda a part of the grow, thought this was the place for pics and whatnot.
Materials in US currency and measurements:
(2) 50 gal trash cans $11 a piece ($22)
(4) 120mm PC fans ($15)
(1) 240mm PC fan ($12)
(1) SYGAVLED 300W LED Grow Light ($70)
(1) 16.4ft strip 5050 LED light strip (for seedlings)
(2) 2 gal smartpots ($5)
(1) 2A AC adapter for PC fans ($8)
(10 pack) mylar emergency blankets, only used 1 ($8)
(1) Surge protector with built in timer ($25)
(1) Roll black duct tape ($3.50)
(1) roll foil tape ($12)
(1) can 3M spray adhesive ($12)
(2) 2L bottles (originally filled with tasty soda)
- and a smattering of Schedule 40 1/2" PVC pipe and fittings (elbows, valves, etc). ($30)
(1) 10' roll of plastic tubing, 3/8" ID ($7)
(2) 1/2" thread to 90 degree 3/8" OD barb fittings ($6)
- Carbon prefilters, had some left over from an old purifier I had years ago, cut to fit (to keep the creepy crawlies out).
- 16 gauge speaker wire (to run as extensions for the PC fan wires)
(1) can black matte PlastiDip (stealth)
(1) old cardboard box (to bend into shape for the air intakes at the bottom) (complimentary from Amazon)
(1) 1.5 cu. ft. bag of Roots Organics Coco
Pics to follow shortly once I figure out how to make them NOT BE SIDEWAYS.
What will I be growing you ask?
1 Blueberry Auto
1 Northern Lights Auto
Both from ILGM.com
GH Flora line, New Earth Organics Smart Tea, and Mammoth P.
-Hyp
@Slater @MiNi @epenguin @Eekman @MissUniverse @iampepe
")


 ....
.... ....and really cool all the detailed information you gave in the description..really cool
  ..like grow journals not only help you but help us too.. so Cheers!! ...Anyways.. really interesting set-up you got there.. don't mind if I sub up 4 the Ride!!