Indoor Adventures with Shallow Water Culture

Joined
Oct 6, 2018
Messages
913
Reputation
205
Reaction score
2,415
Points
0
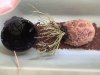
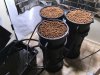
All my future SWC grows will be in this thread now that I have settled on the type of hydro set up I want to use after trying a small basket against a large pot. I'm going to see how far I can push this style, which is basically a plant in a large (27L) pot with inert media (LECA), but the roots then emerge from the net at the bottom into a small space and a two inch pool of nutrient. So this is like adding a DWC after the pot, but the reservoir is separate so it only needs to be shallow.

This allows the roots that emerge from the pot to fill the whole space and remain springy, which does not happen in a DWC because the roots are not supported at the bottom so they just float aimlessly about without any direction in life. I'm trying to combine the advantages that different methods have while eliminating the disadvantages. So This thread will be a proof of concept if you like. The concept being that this type of combined set up is not only easy to do and easy to run, but it's easy to get great results even for a rank beginner.

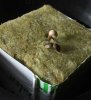
This set up also allows the option at anytime of simply cutting off the lower part and just treating it like any plant in inert media in a pot, which could be handy in case of running out of room. Anyhoo for my first test I have decided to see how three plants do together, when they are all supplied with plenty of nutrients and space. Will they really affect each other if they are pruned out of each others way? I've planted them pretty close together so their roots will certainly be tangled together but I'm hoping that they will each take up a third of the outside part.

I will also be growing two separate plants in the same system, three of these five plants will be in two battles so I'll keep a detailed diary of all five here and just post the weekly updates in the battles.

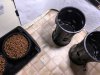
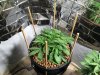
Meanwhile here's all five currently sitting in their pots under a single ChilLED RoyalBlue Puck running at about 70W, with the reservoir by the side. Later there will be two QB96's each running HLG 185 drivers and possibly something else could be needed if things work out well.

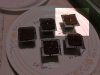
A detailed deconstruction of the pots will be coming.

pot-shot.jpg
 

Attachments

  • pot-shot2.jpg
    pot-shot2.jpg
    112.6 KB · Views: 38
Last edited:
@Damien50, I'll try and make it worthwhile.

OK while we're waiting for something interesting to occur, I'll give a little rundown on how I came to my current set up. First plant was over 20 years ago, I had a 15" pot filled with expanded clay that sat on a 30L tub with a lid. A tube came from the pump to top feed. This worked very well. After that I decided to try large square baskets filled with explained clay sitting in the lid of a giant 800 litre tub that would hold the reservoir and provide space for emerging roots to be sprayed.

Cut to today, at first I still had visions of some sort of misting spraying over the roots so for my first go at auto I tried the set up in my OG Kush grow, which was like a mini version of previous ideas, a small 4" pot with emerging roots being sprayed (not really a spray, that was not going to happen), but the reservoir was under the pot which is awkward. The result was good but the system was clumsy. Then I decided to go right back to the beginning, a large pot filled with expanded clay when I saw a DWC set up by https://www.nutrifield.us/products/pro-pot-system-15-27l/ I didn't like but the way I saw it used but the pots lent themselves to exactly what I wanted to do.

For the purposes of this grow with three plants in a pot, all that I think really matters is that they are in a relatively spacious pot filled to the top with expanded clay with extra room for further outside in a shallow pool of water. They will be using GH Flora 3 part, and nothing else. other than pH buffers. So all that matters is that the roots have the best chance, so let's see what happens.

I was looking for something like this s-l1600.jpg that had no holes, but it had a turned lip. The idea was to drill holes in the bottom fill it with LECA and put it in another one of the same thing without the holes but with a 19mm drain a couple of inches from the bottom and a spacer to keep the top tub a few inches off the bottom.

Then I found and am now using the Pro Pots by https://www.nutrifield.us/products/pro-pot-system-15-27l/ because it's the right size and it already does what I want, but it's still just what I described above. The third pot at the bottom is nothing, it's just a stand. The lip at the top is used to support dowels that will support a scrog that travels with the pot.

OK the advantages of this is 1. that you can move and turn the pot to best advantage without being fixed by an externally supported net. 2. Expanded clay is dumped in the bath afterwards where it floats to the surface and all the debris sinks to the bottom you can then scoop up the medium with a net pot an completely reuse all of it. 3. No possible problems caused by oxygen starvation to the roots, so you do not need an air pump. 4 and external reservoir means it can be large enough so that you don't get wild pH fluctuations or ppm problems caused by nutrient concentration due to evaporation.

I've colour coded the girls.

Yellow is Pineapple Gum
Pink is Pink Grapefruit
White is White Widow
Blue is Glueberry
Orange is Orange Bud

About 7 days since sprout today. Orange Bud is toight like a toiger, whereas Pineapple Gum is a bit wobbly other three are somewhere in between. As usual it's a slow start and the stems have not begun to thicken yet. Meanwhile I've been trying to picture in my mind what I'd like. I was thinking of WW being an untopped backdrop and the two PG's topped and in front just because of the symmetry. But we'll see what happens.

birds-eye.jpg
glueberry.jpg
White-Widow.jpg
Pineapple-Gum.jpg
Pink-Grapefruit.jpg
Orange-Bud.jpg
 

Attachments

  • top roots 3.jpg
    top roots 3.jpg
    113.1 KB · Views: 69
  • bottom roots.jpg
    bottom roots.jpg
    68 KB · Views: 76
  • top roots.jpg
    top roots.jpg
    134.3 KB · Views: 63
Wayhey, howdy boys and girls, I'm embarrassed now to discover some more people found out about my thread but I will make amends, I promised it would be interesting and it will be. While I have been a super duper slack ass, I have nevertheless been assiduously documenting in microscopic detail everything and I'll try and remember what was going on at each moment. On the bright side, it will be like binge watching a season of your favourite show, so I'll take us up to season four, (week four)

First of all let me get Glueberry out of the way, it's a very sad story. She was the most tall and weedy but I think that's just how glueberry is nevertheless I have come to the conclusion that there was a bit too much root disturbance at a crucial time before the roots are established. I probably could have rescued her but it's not worth it, lesson learnedd17.jpg . Well not quite because I buggered the replacement glueberry d17-new-glue.jpg by panicking a bit and removing the membrane d19a.jpg that gets stuck to the cotyldon sometimes. Anyhoo, so that again was too much disturbance. Usually it's fine but not this time. That was my last glueberry so I was a bit pissed off with myself about that, but I just accept that's what's meant to be and gave me an excuse to try a DinaFem MobyDickXXL Auto which is on Day 8 today, MobyDickXXLautoDF.jpg I'll update up to that, and then get back to the other much more fun stuff tomorrow.


Next Post Orange Bud Update...
 

Attachments

  • d10.jpg
    d10.jpg
    109.2 KB · Views: 53
  • d10a.jpg
    d10a.jpg
    81.4 KB · Views: 39
  • d13.jpg
    d13.jpg
    100.6 KB · Views: 37
  • d15.jpg
    d15.jpg
    105.2 KB · Views: 40
  • d19b.jpg
    d19b.jpg
    107.1 KB · Views: 35
  • IMG_4674.jpeg
    IMG_4674.jpeg
    95 KB · Views: 48
  • IMG_4522.jpeg
    IMG_4522.jpeg
    71.5 KB · Views: 44
  • IMG_4439.jpeg
    IMG_4439.jpeg
    143.5 KB · Views: 47
  • IMG_4395.jpeg
    IMG_4395.jpeg
    91.8 KB · Views: 39
  • IMG_4356.jpeg
    IMG_4356.jpeg
    78 KB · Views: 42
Last edited:
@Tyler_Durden88 here's some shots of the tub construction, it's pretty straightforward nothing fancy. Huge 27L pot with a net bottom holds all the clay.

Orange Bud Auto, will likely be my main battle plant. I'm learning fast and I'm going to base what I do with this on on Think Big which was a surprise monster grow. I am deliberately trying to not allow any of my plants to get so large. Think Big was all about yield and it worked out well enough to give me the freedom to do go off in some new exciting directions. I must admit I am absolutely besotted with this whole autoflower concept.

Here's her first week plus a look at the SWC, It's all pretty straightforward once you see the photos, I have a box of plumbing and joints and I do enjoy replumbing everything when I shift things around. I use a 19mm hose for drains and 13mm for inlet. I've put all the holes where I want them to create a shallow pool at the bottom. Later I will attach the self supporting scrog net.

planted.jpg
d7.jpg
 

Attachments

  • d3.jpg
    d3.jpg
    74.7 KB · Views: 51
  • pop.jpg
    pop.jpg
    93.7 KB · Views: 50
  • IMG_3724.jpg
    IMG_3724.jpg
    137.8 KB · Views: 50
  • IMG_3725.jpg
    IMG_3725.jpg
    142 KB · Views: 58
  • IMG_3727.jpg
    IMG_3727.jpg
    147.2 KB · Views: 54
  • IMG_3734.jpg
    IMG_3734.jpg
    162.5 KB · Views: 56
  • IMG_3735.jpg
    IMG_3735.jpg
    189.5 KB · Views: 53
  • IMG_3790.jpg
    IMG_3790.jpg
    159.2 KB · Views: 51
  • IMG_0840.jpg
    IMG_0840.jpg
    67.9 KB · Views: 51
Last edited:
Just to catch up with Orange Bud it is growing similar to Think Big, maybe not quite as fast but close. Right from the seed unlike every other bean this one was very solid no nonsense at all. Week two is pretty standard, Things start moving along in Week three with topping and defoliating culminating in a day of madness at the 4 week mark. Suddenly it was time to clear away the excess leaves and plan Orange Bud and the Three in a pot, to finish all the plants took me about 4 hours, which entailed a few baskets of choice bud for inspiration then back into the war room. After everything was ready I move a chair into position right up to Orange Bud, disconnected all the hoses so I could get up close and turn the entire plant around while I examined her closely.

My original but discarded original scrog has come in handy as a pre scrog, it's heavy with thick metal in a circular pattern so it doesn't damage soft shoots. I suspend it with wire from the sticks and let it's weight hold it down. Eventually this will be removed for the proper lightweight scrog net that will attach higher up the sticks...

d22.jpg I came in close I topped at the 4th node at the very earliest possible time. I was very careful not to damage anything but I did tear a little bit of fibre from the side. This was all unnecessary I could have just waited a couple more days for it to grow out because it doesn't make it grow out faster anyway. Lesson learned. I didn't take a chance and left the shoot a bit mashed and cleaned it up later. Two huge thick healthy fan leaves have already been removed.

d23.jpg When I took these leaves off it was like a debutante being presented to the world. What mysteries lie under those huge fan leaves. You can see the stump of the even larger fan leaves that were removed. Huge juicy perfect leaves, it look like a severed limb with bundles of green muscles. It's tough to do.

Shoots now pushing through d24.jpg
And every leaf is a target, I'm in the zone, off with those leaves... d25.jpgd26.jpg d27.jpg

Ready for day 28. First to install the scrog support, a 1mm hole is drilled into the 8mm dowel and whittled to a blunt point, about 40cm long. Most tubs have a lip on the edge so a 6mm hole is drilled into the top lip to hold the 8mm dowel nice and snug. Then I drill a smaller hole in the lip of the lower tub that will hold the point and keep the stick in place.

IMG_4570.jpg
IMG_4562.jpg
IMG_4569.jpg
IMG_4563.jpg
 

Attachments

  • d22cu.jpg
    d22cu.jpg
    78.5 KB · Views: 45
  • IMG_4563.jpg
    IMG_4563.jpg
    210.8 KB · Views: 47
Hey - Hi Member420 ...... OldBoy here, how ya doing ..... I see your into DWC, Cool Beans .....

Subbed thread.

Peace,
OB
 
Hey - Hi Member420 ...... OldBoy here, how ya doing ..... I see your into DWC, Cool Beans .....

Subbed thread.

Peace,
OB

Welcome to the thread, it's basically being run by the plants themselves. I just see myself as their humble servant. I medicate with a few basketfuls of herb, then they make me do what they want. It's weird, they communicate with me. So this three in a pot experiment is the beginning of this exploration. At the moment for example it looks like Pink Grapefruit would be a marvellous plant to grow three or even four in the same pot with less branches each. Thanks to the cannabis elf.

canabis-elf.jpg
 
Last edited:
Welcome to the thread, it's basically being run by the plants themselves. I just see myself as their humble servant. I medicate with a few basketfuls of herb, then they make me do what they want. It's weird, they communicate with me. So this three in a pot experiment is the beginning of this exploration. At the moment for example it looks like Pink Grapefruit would be a marvellous plant to grow three or even four in the same pot with less branches each. Thanks to the cannabis elf.

View attachment 1062754

Good luck with the experiment - Best way to learn, for sure ....

2-3-4 Plants per Container is doable and will create a competition between themselves, so I’ve heard but I’ve never tried myself.

Peace,
OB
 
@MrOldBoy "...is doable and will create a competition between themselves, so I’ve heard but I’ve never tried myself."

That has pretty well nailed my entire philosophy, not just with dope but with life. On a whim I looked up on google if it's possible to grow more than one plant in a pot. I was amazed to discover almost nothing on this and what there was all said the same things. Here's a typical dialog from the Rollitup...

OP: After months of research I have found little on this, I am crammped for space, not for pots for lights, Could I put 3 plants in 1, 5 gallon pot. What problems would this cause. My grow is CFL so I am also worried about them sharing the light to.

Person 1: no u can't.

Person 2: Yeah, that's probably not a good idea. You're setting yourself up for a hard fall due to a whole raft of problems caused by overcrowding.
Think it over

OP: thats all I needed to know , Thanks
 
Back
Top