Magic
Canna Engineer
I Found This on The Nug just looking around trying to learn more about anything i can and Thought it could help some people out because of the live pics. Hope this ok if its a problem please one of the Mod's let me know and i will take it down.:tiphat:

Use the following pictures to quickly and easily diagnose your sick marijuana plants! The guys at GrowWeedEasy.com have some great tips waiting for you!
Most nutrient problems can be cleared up by flushing your system with clean, pH'd water that contains about half the correct amount of nutrients needed by the plant. Learn more about the nutrients you need for your marijuana plant.
In addition to nutrient deficiencies, there's also various bugs, mold, and other pests that can attack your marijuana.
Many bugs, molds, and pests can be eradicated with SM-90. Mist your plants in a solution made of 1 part SM-90, 5 parts water.
2

Problem: Cannabis leaves and roots show abnormal and slowed growth when showing a boron defiency. The first signs of a cannabis boron deficiency is abnormal or thick growth tips. New leaves may display chlorosis (yellowing of leaves). Stems may become rough or hollow. The plant may look like it has a calcium deficiency because boron is needed for the plant to properly use calcium. New growth is affected the most, and may look like it's been burnt or scorched.
Solution: Boron is not absorbed will without enough potassium and nitrogen, or if there isn't enough moisture. You plant may also exhibit signs of a boron deficiency if the pH is too high or low. Flush your system with clean, pH'd water that contains about half the nutrients needed for the plant and watch to make sure that the problem clears up for new growth.
3

Problem: Signs of a cannabis calcium deficiency can be hard to pin down since calcium deficiencies are often accompanied by magnesium, iron, and other deficiencies. However, some of the major signs of a calcium deficiency are in the leaves which will display dead spots, crinkling, spotting, or small brown spots. Another sign of a cannabis calcium deficiency is new leaves will appear small and distorted with curled tips The insides of the plant and well as the flowers/buds may show signs of decay. Roots may show signs of bacteria and may be dying off or be under developed.
Solution: If the pH of your root zone is off, then your cannabis cannot properly absorb calcium through its roots so the first step is to ensure that you have the correct pH for your growth medium. Learn more about pH and cannabis. Different strains of cannabis tend to have different nutrient problems, but calcium, magnesium, and iron deficiencies often appear together in cannabis. Therefore many growers decide to purchase some sort of Calcium-Magnesium (often called Cal-Mag) supplement for their grow room in case this common deficiency appears. I have listed some available Cal-Mag supplements that I have used along below with some general information about each one. After supplementing with Cal-Mag and correcting the pH, you should expect to see new healthy growth within a week.
Botanicare Cal-Mag Plus
How to Use Dolomite Lime for Cannabis: When growing cannabis indoors, add 6-7 teaspoons of fine dolomite lime to each gallon's worth of soil. So if you're mixing enough soil to fill a 5 gallon container, you want to add 30-35 teaspoons (about 2/3 cup) of dolomite lime to the mix. Mix the dolomite lime and the dry soil thoroughly, then lightly water it with water that has been pH'ed to 6.5. After getting the soil wet, mix the soil well and wait a day or two to let the soil settle before checking the pH and adding plants. When growing in an outdoor garden, follow the dolomite lime manufacturers instructions.
Advertisement
http://www.thenug.com/api/outbound?target=http://www.playbud.org
4

Problem: A cannabis copper deficiency manifests itself as leaves curling back, lack of growth, and unusual coloring of the leaves. New young leaves may be dark and twisted, while other leaves may start showing signs of yellow or white. It is very unlikely that there is no copper available in your water or soil. Copper deficiencies generally crop up when there is a pH problem, so that the cannabis can't get to the copper even though it's there.
Solution: Flush your system with clean, pH'd water that contains about half the correct amount of nutrients needed by the plant. Watch to make sure that the problem starts to clear up within a couple of days.
5

Problem: Your cannabis plant can only withstand a certain amount of heat and light. After a certain point, your cannabis will start exhibiting signs of stress on the leaves near the sources of light and/or heat. Your leaves will get yellow or brown brown spotting and may appear generally burnt in places when there's too much light.
If you directly touch a plant's leaves with the lights, you will also leave "burns" if the bulbs were hot when they touched the leaves.
When the heat gets too high, the edges of the serrated leaves will begin to curl up even if there are no burns or other signs of light stress.
Solution: Find a way to lower the temperature and/or increase the circulation in the grow room or grow area if heat is the problem. Having a small fan blowing over the tops of your plants will help prevent hot spots from forming directly under your grow lights.
If your marijuana plants are just getting too much light, try removing some of the lights or moving your lights further away from the tops of the plants.
When learning how to weed, it's best to try to keep things at a comfortable room temperature at all times for optimal growth. If it's too hot for you, it's probably too hot for your plants.
6

Same As Above
7

Problem: Leaves may become yellow in between the veins, with mottled brown spots on the affected leaves. These brown dead patches may spread and eventually kill the leaf. Leaves may also shred and fall apart.
Overall growth of the marijuana plant may be stunted.
Solution: Manganese deficiencies are often caused by a pH that is too high, or if the plant is getting too much iron.
If you have a manganese deficiency in soil, try to correct pH to 6.0 - 6.5l. In hydro, correct pH to 5.5 - 6.0. You are looking to avoid higher pH ranges, as this is where manganese deficiencies are most likely to occur.
Flush your system with clean, pH'd water that contains about half the correct amount of nutrients needed by the plant. Watch to make sure that the problem starts to clear up within a couple of days.
8

Problem: The initial symptoms may appear similar to a nitrogen deficiency (yellowing of older, lower leaves). Leaves may become mottled or spotted. However, the tell-tale sign of a molybdenum deficiency is the leaves may start to display a unique orange, red or pink color around the edges which will start to move toward the center of the leaf. Sometimes the color appears in the middle of the leaves as opposed to the edges.
Solution: Flush your system with clean, pH'd water that contains about half the correct amount of nutrients needed by the plant. Watch to make sure that the problem starts to clear up within a couple of days. Molybdenum gets locked out at lower pH ranges. Molybdenum may get locked out in soil that has a pH of lower than 6.5. With hydro or soil-less mediums, molybdenum may be locked out at pH ranges of 5.5-6.0 and lower. Try to keep the pH of your growing medium above these ranges to help prevent a molybdenum deficiency.
9

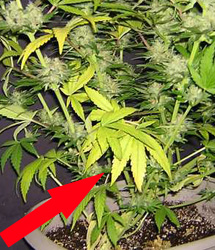
Problem: Dark green leaves, weak stems, and overall slow growth. Marijuana leaves that are nitrogen toxic often get "The Claw" or talon-like leaves that are bent at the ends. The also do a weird curving / cupping that is often mistaken for overwatering, but is unique to nitrogen toxicity. You can see a picture of this leaf "clawing" below.
Leaves that turn into claws often start turning yellow and dying if the nitogen toxicity is not treated, much like a nitrogen deficiency, only the leaves will continue to get more and more clawed. Leaves eventually turn yellow or brown and fall off. You can tell if yellowing is caused by too much nitrogen because the rest of the plant will be dark green, and the yellowing leaves will turn into claws first.
Different strains react differently to nitrogen toxicity. Some plants get dark green leaves with no clawing. Some strains will get leaves that do the weird 90 degree bend at the tips, while other strains or individual plants start curling like claws and then turn yellow / brown and fall off like a deficiency. Yet these are all signs of too much nitrogen.
Signs of Nitrogen Toxicity
Solution: Reduce the Nitrogen your plant is getting!
Reduce the amount of nitrogen that is being fed to the plants. If you are feeding extra nutrients, cut down. If you are in the flowering / budding stage, make sure you're using a formula that's specifically meant for flowering, or else it will have too much nitrogen.
If you are not feeding extra nutrients, you may have "hot" soil that has been supplementing with extra nutrients. In that case, flush your plants with filtered, pH'ed water to help leech out the extra nitrogen.
Effected leaves likely won't recover, but you should stop seeing the problem spread to more parts of the plant.
Wait! I'm not sure if it's a Nitrogen toxicity!
Ok, you ruled out overwatering, now what?
When I first got started growing, everyone kept telling me that this particular kind of leaf clawing was caused by under or overwatering my plants, pH problems, or heat problems.
Yet in my case, I knew that it wasn't over or under watering (I was growing in hydro, where roots grow directly in water and air stones are constantly adding oxygen). I knew it wasn't pH (my reservoir water had the right pH) and I knew it wasn't heat since the grow area was slightly cooler than room temperature.
So then what was really causing my claw leaves?
It's understandable that other growers were mistaken. It is true that many stresses will make any other problem worse.
Plus overwatering can cause a similar kind of leaf clawing (learn more below). And if you do have nitrogen toxicity, than heat or pH problems will make the problem much worse as your plant is too weak to fight back.
Now, you may or may not know that marijuana (or any plant) needs an element known as "Nitrogen" to grow.
In fact, nitrogen is one of the 3 nutrients that is included in almost every kind of plant food.
When looking at plant nutrients, you'll almost always see 3 numbers listed, like 3-12-6 or 5-10-5. These numbers represent the percentage of Nitrogen (N), Phosphorous (P) and Potassium (K) contained in the bottle. Just about all plant life on Earth needs these 3 elements to grow.
For marijuana plants, when they don't get enough nitrogen, the bottom leaves start turning yellow and dying. Left unchecked, a nitrogen deficiency can cause the the whole plant to eventually die.
What I'm here to talk to you about today is the opposite, nitrogen toxicity, or too much nitrogen.
Why You Should Treat And Prevent Nitrogen Toxicity
Problems with excess nitrogen are not common in the wild, it's a lot more common to see nitrogen toxicity on indoor plants, especially when overzealous growers go overboard with nutrients.
Occasionally you'll come across a strain or particular plant that likes lower levels of nutrients, and when this happens, it's important to realize the plant is showing signs of toxicity, even if all the other plants in your garden seem fine.
One of the most common signs off too-many-nutrients is "nutrient burn," or when the tips of your leaf appear brown or burned. Yet there are specific signals your plant will display when she's getting too much nitrogen...
How You Know You Have a Nitrogen Toxicity
Light and The Claw
Note: During the last few weeks before harvest, marijuana plants starts pulling all the remaining nitrogen from her leaves as part of the bud-making process. This causes yellowing leaves starting towards the bottom of the plant. This is part of the natural flowering process and you don't need to fight it.You may notice that marijuana leaves are yellowing in almost all pictures of marijuana plants with big buds that are close to harvest. You tend to get smaller yields from nitrogen-toxic plants with dark green leaves at harvest.
 I know a lot of marijuana plant problems can look similar, but now that you're armed with the right information, you'll know exactly what to do if you see Nitrogen Toxicity affecting your marijuana plants.
10

Problem: You may notice the tips of your plants showing signs of nutrient burn. If it only seems to be affecting the tips, then there's no need to worry, but if you start noticing the problem spread to the whole leaf, then you should immediately do something to treat your plant before there's more damage. Nutrient burn can also manifest itself as random spots around the edges of the leaves, or with leaf tips curling downwards.
Solution: Flush your system with plain, pH'ed water. Give your plants some time to recover, and start them with a fraction of the nutrients you were giving them before working your way up to more nutrients. Many nutrients come with instructions to feed your plant more nutrients than most plants actually need. It's good business for them if you use more nutrients. However, in my experience it's a good idea to view the feeding charts that come with nutrients as the maximum amount of nutrients and actually start with much less.
11

Problem: Your plants leaves will start drooping if they've been over-watered or under-watered. If you've overwatered your plant, its leaves will be firm and curled down all the way to the stem of the leaf. You may also notice Chlorosis (Leaf Yellowing).
Plants use their roots to get oxygen which is dissolved in water or oxygen in their grow medium. When you overwater a plant, its roots are sitting in stagnant water which no longer has any oxygen left. The reason your plants droop is because basically their roots are starving for oxygen.
Overwatered Marijuana Plants
If plant medium seems to stay wet, you may need better drainage. Make sure that water drains freely from the bottom of your container (it's recommended that you provide enough water to get at least 20% extra runoff every time you water your plants). You should see water coming out the bottom within a minute or two after watering. Then don't water your plants again until the soil is dry up to your first knuckle.
If your plants are already overwatered, you can try to increase the temperature and airflow to help the water evaporate more quickly. You can also use a pencil to gently poke some air holes into the growing medium to provide extra aeration and oxygen to the roots.
For soil grows, you generally only want to water the plant when the soil feels dry if you press a finger in it. You can also use the "lift the pot" method to decide when to water your plants (basically wait until your pot feels "light" since the plants have used up all the water). For other growing mediums besides soil, your watering method will vary, but if your plants are drooping and you've been feeding them a lot of water, it's a good idea to cut back and see if that helps.
If you're growing hydroponically with your marijuana roots directly in water and you see the signs of overwatering, that means you have a problem at your roots. Either your plants have root rot which is preventing them from getting oxygen at their roots, or you are not dissolving enough oxygen into the water (you can easily increase the dissolved oxygen in your water with a quality air pump and a few air stones).
12

Problem: Phosphorus aids in root growth and overall health of the plant and is especially essential when the plant is in flowering. Cannabis loves phosphorus and it is very unlikely that cannabis gets too much phosphorus. A plant which is deficient in phosphorus will have slow, stunted growth. If there is a major deficiency, the leaves may exhibit dark gray or purplish splotches. The last picture below is an info-graphic with more information about phosphorus and your marijuana plant.
Solution: Check the pH and flush system. An excess of Fe and Zn may cause a phosphorus deficiency. If you've tried everything else, then you may try adding a bit more phosphorus to your feeding schedule and see if that helps clear up the problem. Cannabis plants love phosphorus, and therefore it is unlikely that you will give your cannabis too much phosphorus.
Advertisement
http://www.thenug.com/api/outbound?target=https://www.vapir.com/
13

Problem: Older leaves turn yellow then start getting dark, scorched lesions around the edges of the leaves. Plants may stretch and stems may become weak. The symptoms are very similar to an iron deficiency except the tips of the leaves curl as the edges burn and die. The last picture below has some more information about the potassium requirements of your marijuana plant.
Solution: Potassium isn't absorbed properly when there is too much calcium or nitrogen in the system. Check the pH of your water, and flush your whole system with water that contains half the normal amount of nutrients and see if your plant starts showing signs of improvement.
14

Problem: Roots need water, but if they are exposed to water with bacteria they will start to rot. Roots that have been drowning in too much water without enough available oxygen are much more susceptable to problems. Healthy roots are white to cream-colored while roots affected by root rot are brownish and actually smell like they're rotting. Plants affected by root rot will spontaneously start losing their leaves, yellowing, drooping, and otherwise look like they're dying. You will also notice that affected plants will start drinking less water. If you notice these symptoms in your plant, then it can't hurt to try all the suggestions for stopping root rot.
It's important to notes that root damage is permanent. A recovering plant will be able to make new growth, but it's old infected roots will likely never recover. Root rot mostly affects hydroponic systems, but can also result from over watering your plants in soil or other medium. Basically anytime the roots are sitting in water, they are at risk of devloping root rot.
If you don't fix the environmental causes of root rot, then it will just keep coming back no matter what you do. Therefore, it's important to go through the below list and make sure you're covering all your bases to prevent a re-occurrence. It's also important to note that affected roots will likely never recover, just like how discolored leaves on the plant will never recover. What you're looking for is new, healthy white root growth.
 I personally recommend Aquashield for marijuana root problems because I've used it successfully to get rid of a terrible case of Root Rot (and by 'successul' I mean new white roots exploded out of the old mushy brown ones and I was able to eventually harvest the buds).
Aquashield is also much cheaper than most other similar root treatments,
In addition to treating root rot, Aquashield also works as a preventative, even in hot, unclean reservoirs. Since I first started using Aquashield in DWC, bubbleponics, and other hydroponics, it has successfully preventing me from getting root rot as long as I keep using it. I also use it when growing in soil if I suspect root problems.
How to prevent and treat root rot:

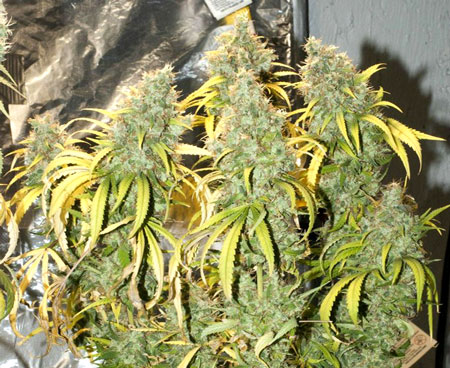
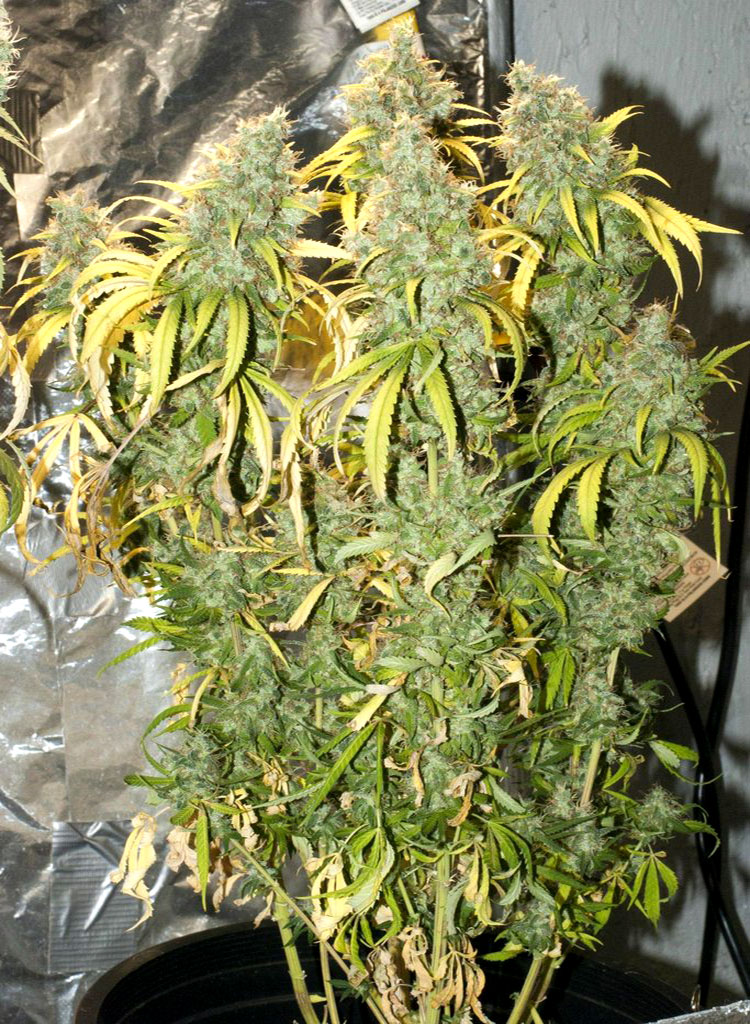
Problem: A sulfur deficiency will manifest itself as all-over chlorosis (yellowing of leaves) starting with the oldest leaves and may look like a nitrogen deficiency at first. The parts that are underneath the leaves may take on a distinctive pinkish red or orange color. The buds on a flowering plant may start dying off. Unlike other deficiencies that cause chlorosis, a sulfur deficiency will start at the back of the leaf and move it's way forward as opposed to started at the tips. Leaves become stiff and brittle and will eventually fall off.
Solution: Check and correct your pH to make sure that your sulfur isn't being locked out. Sulfur moves slowly through the plant so it may take a few days after you fix the problem before you start noticing an improvement in your plant.
http://www.thenug.com/api/outbound?target=http://www.nakednews.com/?nnid=iag64868
16

Problem: If your plant is drooping and you're sure you haven't overwatered it, than it might need more water. If you've been underwatering your plant, its leaves will look limp and lifeless.
Solution: While it can be good to let your plant dry out a bit after watering, you should always water the plant again before it's leaves start drooping. A good way to tell if a potted plant is ready to be watered is to pick it up and tell if it feels heavy or not. As plants use up all the water in their pot, it will start to get lighter. If you need something for comparison, you can get an extra pot and fill it with your growing medium. Now you can use this extra container for comparison with your potted plants as it represents the 'dry weight' of your growing medium. If you pick up a potted plant and its feels just slightly heavier than your dry pot, then you know it's time to water your plant. After a while you get a feel for how heavy your plants need to be and you may not even need the extra pot anymore.
Click here to see a time-lapse of an under-watered marijuana plant coming back to life.
17

Problem: Younger leaves start yellowing in between the veins. Leaf tips get discolored and start dying. the leaves will take a unique banded appearance and the plant will stop growing vertically. There will be much less space between new nodes which will cause all the new leaves to start bunching together. If the plant is budding, it's flowers may start dying.
Solution: Flush your system with clean, pH'd water that contains about half the nutrients needed for the plant (including zinc, iron, and manganese). Watch to make sure that the problem starts to clear up on new growth within a couple of days.
and Thought it could help some people out because of the live pics. Hope this ok if its a problem please one of the Mod's let me know and i will take it down.:tiphat:
Use the following pictures to quickly and easily diagnose your sick marijuana plants! The guys at GrowWeedEasy.com have some great tips waiting for you!
Most nutrient problems can be cleared up by flushing your system with clean, pH'd water that contains about half the correct amount of nutrients needed by the plant. Learn more about the nutrients you need for your marijuana plant.
In addition to nutrient deficiencies, there's also various bugs, mold, and other pests that can attack your marijuana.
Many bugs, molds, and pests can be eradicated with SM-90. Mist your plants in a solution made of 1 part SM-90, 5 parts water.
2
Problem: Cannabis leaves and roots show abnormal and slowed growth when showing a boron defiency. The first signs of a cannabis boron deficiency is abnormal or thick growth tips. New leaves may display chlorosis (yellowing of leaves). Stems may become rough or hollow. The plant may look like it has a calcium deficiency because boron is needed for the plant to properly use calcium. New growth is affected the most, and may look like it's been burnt or scorched.
Solution: Boron is not absorbed will without enough potassium and nitrogen, or if there isn't enough moisture. You plant may also exhibit signs of a boron deficiency if the pH is too high or low. Flush your system with clean, pH'd water that contains about half the nutrients needed for the plant and watch to make sure that the problem clears up for new growth.
3
Problem: Signs of a cannabis calcium deficiency can be hard to pin down since calcium deficiencies are often accompanied by magnesium, iron, and other deficiencies. However, some of the major signs of a calcium deficiency are in the leaves which will display dead spots, crinkling, spotting, or small brown spots. Another sign of a cannabis calcium deficiency is new leaves will appear small and distorted with curled tips The insides of the plant and well as the flowers/buds may show signs of decay. Roots may show signs of bacteria and may be dying off or be under developed.
Solution: If the pH of your root zone is off, then your cannabis cannot properly absorb calcium through its roots so the first step is to ensure that you have the correct pH for your growth medium. Learn more about pH and cannabis. Different strains of cannabis tend to have different nutrient problems, but calcium, magnesium, and iron deficiencies often appear together in cannabis. Therefore many growers decide to purchase some sort of Calcium-Magnesium (often called Cal-Mag) supplement for their grow room in case this common deficiency appears. I have listed some available Cal-Mag supplements that I have used along below with some general information about each one. After supplementing with Cal-Mag and correcting the pH, you should expect to see new healthy growth within a week.
Botanicare Cal-Mag Plus
is a calcium, magnesium, and iron plant nutrient supplement. General application is to mix 1 tsp (5ml) of Cal-Mag into each gallon of water. I have used Cal-Mag Plus several times with great results.
Guaranteed Analysis: Nitrogen (N) 2.0%, Calcium (Ca) 3.2%, Magnesium (Mg) 1.2%, Iron (Fe) 0.1%
Derived from: Calcium Nitrate, Magnesium Nitrate, Iron EDTA
Dolomite Lime
If you're looking for something that can be used in your organic setup, I highly recommend a product called "Dolomite Lime." Dolomite is a good source of calcium and magnesium and can be mixed with your soil. The great thing about dolomite is it works slowly over the course of a few months. Dolomite has a neutral pH of about 7.0 and will help keep soil at the correct neutral pH range which is optimum for cannabis growth. You can buy Dolomite Lime online, but with shipping it's almost always waaaay cheaper to pick up a bag at a home improvement or gardening store such as Lowes, Home Depot, gardening centers, etc. If possible, try to get a finer grade of dolomite compared to something that is more coarse.Guaranteed Analysis: Nitrogen (N) 2.0%, Calcium (Ca) 3.2%, Magnesium (Mg) 1.2%, Iron (Fe) 0.1%
Derived from: Calcium Nitrate, Magnesium Nitrate, Iron EDTA
Dolomite Lime
How to Use Dolomite Lime for Cannabis: When growing cannabis indoors, add 6-7 teaspoons of fine dolomite lime to each gallon's worth of soil. So if you're mixing enough soil to fill a 5 gallon container, you want to add 30-35 teaspoons (about 2/3 cup) of dolomite lime to the mix. Mix the dolomite lime and the dry soil thoroughly, then lightly water it with water that has been pH'ed to 6.5. After getting the soil wet, mix the soil well and wait a day or two to let the soil settle before checking the pH and adding plants. When growing in an outdoor garden, follow the dolomite lime manufacturers instructions.
Advertisement
http://www.thenug.com/api/outbound?target=http://www.playbud.org
4
Problem: A cannabis copper deficiency manifests itself as leaves curling back, lack of growth, and unusual coloring of the leaves. New young leaves may be dark and twisted, while other leaves may start showing signs of yellow or white. It is very unlikely that there is no copper available in your water or soil. Copper deficiencies generally crop up when there is a pH problem, so that the cannabis can't get to the copper even though it's there.
Solution: Flush your system with clean, pH'd water that contains about half the correct amount of nutrients needed by the plant. Watch to make sure that the problem starts to clear up within a couple of days.
5
Problem: Your cannabis plant can only withstand a certain amount of heat and light. After a certain point, your cannabis will start exhibiting signs of stress on the leaves near the sources of light and/or heat. Your leaves will get yellow or brown brown spotting and may appear generally burnt in places when there's too much light.
If you directly touch a plant's leaves with the lights, you will also leave "burns" if the bulbs were hot when they touched the leaves.
When the heat gets too high, the edges of the serrated leaves will begin to curl up even if there are no burns or other signs of light stress.
Solution: Find a way to lower the temperature and/or increase the circulation in the grow room or grow area if heat is the problem. Having a small fan blowing over the tops of your plants will help prevent hot spots from forming directly under your grow lights.
If your marijuana plants are just getting too much light, try removing some of the lights or moving your lights further away from the tops of the plants.
When learning how to weed, it's best to try to keep things at a comfortable room temperature at all times for optimal growth. If it's too hot for you, it's probably too hot for your plants.
6
Same As Above
7
Problem: Leaves may become yellow in between the veins, with mottled brown spots on the affected leaves. These brown dead patches may spread and eventually kill the leaf. Leaves may also shred and fall apart.
Overall growth of the marijuana plant may be stunted.
Solution: Manganese deficiencies are often caused by a pH that is too high, or if the plant is getting too much iron.
If you have a manganese deficiency in soil, try to correct pH to 6.0 - 6.5l. In hydro, correct pH to 5.5 - 6.0. You are looking to avoid higher pH ranges, as this is where manganese deficiencies are most likely to occur.
Flush your system with clean, pH'd water that contains about half the correct amount of nutrients needed by the plant. Watch to make sure that the problem starts to clear up within a couple of days.
8
Problem: The initial symptoms may appear similar to a nitrogen deficiency (yellowing of older, lower leaves). Leaves may become mottled or spotted. However, the tell-tale sign of a molybdenum deficiency is the leaves may start to display a unique orange, red or pink color around the edges which will start to move toward the center of the leaf. Sometimes the color appears in the middle of the leaves as opposed to the edges.
Solution: Flush your system with clean, pH'd water that contains about half the correct amount of nutrients needed by the plant. Watch to make sure that the problem starts to clear up within a couple of days. Molybdenum gets locked out at lower pH ranges. Molybdenum may get locked out in soil that has a pH of lower than 6.5. With hydro or soil-less mediums, molybdenum may be locked out at pH ranges of 5.5-6.0 and lower. Try to keep the pH of your growing medium above these ranges to help prevent a molybdenum deficiency.
9
Problem: Dark green leaves, weak stems, and overall slow growth. Marijuana leaves that are nitrogen toxic often get "The Claw" or talon-like leaves that are bent at the ends. The also do a weird curving / cupping that is often mistaken for overwatering, but is unique to nitrogen toxicity. You can see a picture of this leaf "clawing" below.
Leaves that turn into claws often start turning yellow and dying if the nitogen toxicity is not treated, much like a nitrogen deficiency, only the leaves will continue to get more and more clawed. Leaves eventually turn yellow or brown and fall off. You can tell if yellowing is caused by too much nitrogen because the rest of the plant will be dark green, and the yellowing leaves will turn into claws first.
Different strains react differently to nitrogen toxicity. Some plants get dark green leaves with no clawing. Some strains will get leaves that do the weird 90 degree bend at the tips, while other strains or individual plants start curling like claws and then turn yellow / brown and fall off like a deficiency. Yet these are all signs of too much nitrogen.
Signs of Nitrogen Toxicity
- Dark green leaves and foliage
- Leaf tips may turn down, without signs of overwatering.
- You may notice yellowing on the affected leaves or other signs of nutrient deficiencies as time goes on
- Nitrogen toxicity is often but not always accompanied by nutrient burn
- The Claw often seems random, affecting leaves here and there
- Heat and pH problems will make the clawing worse, as they stress out the plant and lower her defenses
- As time goes on, the claw leaves will eventually start turning yellow, getting spots, and dying
Solution: Reduce the Nitrogen your plant is getting!
Reduce the amount of nitrogen that is being fed to the plants. If you are feeding extra nutrients, cut down. If you are in the flowering / budding stage, make sure you're using a formula that's specifically meant for flowering, or else it will have too much nitrogen.
If you are not feeding extra nutrients, you may have "hot" soil that has been supplementing with extra nutrients. In that case, flush your plants with filtered, pH'ed water to help leech out the extra nitrogen.
Effected leaves likely won't recover, but you should stop seeing the problem spread to more parts of the plant.
Wait! I'm not sure if it's a Nitrogen toxicity!
Ok, you ruled out overwatering, now what?
When I first got started growing, everyone kept telling me that this particular kind of leaf clawing was caused by under or overwatering my plants, pH problems, or heat problems.
Yet in my case, I knew that it wasn't over or under watering (I was growing in hydro, where roots grow directly in water and air stones are constantly adding oxygen). I knew it wasn't pH (my reservoir water had the right pH) and I knew it wasn't heat since the grow area was slightly cooler than room temperature.
So then what was really causing my claw leaves?
It's understandable that other growers were mistaken. It is true that many stresses will make any other problem worse.
Plus overwatering can cause a similar kind of leaf clawing (learn more below). And if you do have nitrogen toxicity, than heat or pH problems will make the problem much worse as your plant is too weak to fight back.
Now, you may or may not know that marijuana (or any plant) needs an element known as "Nitrogen" to grow.
In fact, nitrogen is one of the 3 nutrients that is included in almost every kind of plant food.
When looking at plant nutrients, you'll almost always see 3 numbers listed, like 3-12-6 or 5-10-5. These numbers represent the percentage of Nitrogen (N), Phosphorous (P) and Potassium (K) contained in the bottle. Just about all plant life on Earth needs these 3 elements to grow.
The very first number, "3" in the case of the picture to the right, always displays the proportion of nitrogen in this nutrient bottle compared to the other 2 nutrients (Phosphorus and Potassium respectively).
The reason nitrogen is in all plant nutrient formulations is because it's vital to plant processes. For marijuana plants, when they don't get enough nitrogen, the bottom leaves start turning yellow and dying. Left unchecked, a nitrogen deficiency can cause the the whole plant to eventually die.
What I'm here to talk to you about today is the opposite, nitrogen toxicity, or too much nitrogen.
Why You Should Treat And Prevent Nitrogen Toxicity
- Marijuana plants that get too much Nitrogen in the vegetative stage don't grow as vigorously.
- Too much nitrogen is especially harmful in the flowering stage, because this will cause your plant to produce smaller buds.
- If you react quickly and reduce your nitrogen levels at the first sign of toxicity, your plant will quickly recover.
Problems with excess nitrogen are not common in the wild, it's a lot more common to see nitrogen toxicity on indoor plants, especially when overzealous growers go overboard with nutrients.
Occasionally you'll come across a strain or particular plant that likes lower levels of nutrients, and when this happens, it's important to realize the plant is showing signs of toxicity, even if all the other plants in your garden seem fine.
One of the most common signs off too-many-nutrients is "nutrient burn," or when the tips of your leaf appear brown or burned. Yet there are specific signals your plant will display when she's getting too much nitrogen...
How You Know You Have a Nitrogen Toxicity
- Dark green leaves and foliage
- Leaf tips turn down, without signs of overwatering.
- You may notice yellowing on the affected leaves or other signs of nutrient deficiencies as time goes on
- Nitrogen toxicity is often but not always accompanied by nutrient burn
- The Claw often seems random, affecting leaves here and there
- Heat and pH problems will make the clawing worse, as they stress out the plant and lower her defenses
- As time goes on, the claw leaves will eventually start turning yellow, getting spots, and dying
Light and The Claw
- The distance between the leaves to the lights or irregular light patterns from reflectors often seem to affect the condition, which is why many growers believe that light is somehow causing the problem.
- You may notice this clawing first appears on dark green leaves that aren't getting enough light (they aren't able to use up all their nitrogen and become nitrogen toxic).
- If you use vegetative plant nutrients during the flowering stage, then they'll deliver too much nitrogen. This is why you need to get special nutrients meant for the blooming / flowering stage. You'll notice that flowering nutrients always contain a smaller percentage of nitrogen (the first number) compared to nutrients for the vegetative stage. Learn more about marijuana nutrients here.
- Many growers mistakenly keep raising nutrient levels or adding additional nitrogen when they see yellow leaves in the flowering stage, not realizing that it's natural for plant leaves to start yellowing as harvest approaches. Adding too much nitrogen in the flowering stage can cause nitrogen toxicity even when you can see yellow lower leaves
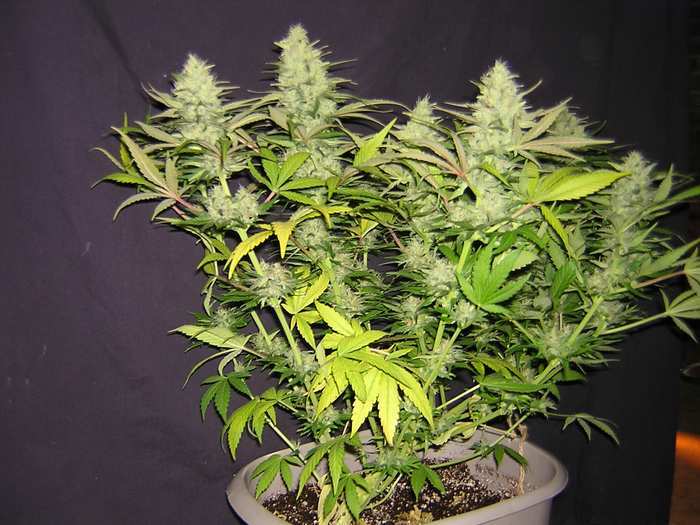
Note: During the last few weeks before harvest, marijuana plants starts pulling all the remaining nitrogen from her leaves as part of the bud-making process. This causes yellowing leaves starting towards the bottom of the plant. This is part of the natural flowering process and you don't need to fight it.You may notice that marijuana leaves are yellowing in almost all pictures of marijuana plants with big buds that are close to harvest. You tend to get smaller yields from nitrogen-toxic plants with dark green leaves at harvest.
It's Normal For Marijuana Leaves To Start Turning Yellow As Harvest Time Approaches, Don't Keep Adding More Nitrogen!
10
Problem: You may notice the tips of your plants showing signs of nutrient burn. If it only seems to be affecting the tips, then there's no need to worry, but if you start noticing the problem spread to the whole leaf, then you should immediately do something to treat your plant before there's more damage. Nutrient burn can also manifest itself as random spots around the edges of the leaves, or with leaf tips curling downwards.
Solution: Flush your system with plain, pH'ed water. Give your plants some time to recover, and start them with a fraction of the nutrients you were giving them before working your way up to more nutrients. Many nutrients come with instructions to feed your plant more nutrients than most plants actually need. It's good business for them if you use more nutrients. However, in my experience it's a good idea to view the feeding charts that come with nutrients as the maximum amount of nutrients and actually start with much less.
11
Problem: Your plants leaves will start drooping if they've been over-watered or under-watered. If you've overwatered your plant, its leaves will be firm and curled down all the way to the stem of the leaf. You may also notice Chlorosis (Leaf Yellowing).
Plants use their roots to get oxygen which is dissolved in water or oxygen in their grow medium. When you overwater a plant, its roots are sitting in stagnant water which no longer has any oxygen left. The reason your plants droop is because basically their roots are starving for oxygen.
Overwatered Marijuana Plants
- Drooping / Curling is the first sign of overwaterd marijuana plants
- Leaves are firm and curled down all the way from the stem to the leaf
- Will eventually lead to leaf yellowing and other signs of nutrient problems if not corrected
Solution: The best thing you can do for overwatered plants is give them time without watering, and then start off watering slowly until things seem back to normal.
Learn how to water your marijuana plants.If plant medium seems to stay wet, you may need better drainage. Make sure that water drains freely from the bottom of your container (it's recommended that you provide enough water to get at least 20% extra runoff every time you water your plants). You should see water coming out the bottom within a minute or two after watering. Then don't water your plants again until the soil is dry up to your first knuckle.
If your plants are already overwatered, you can try to increase the temperature and airflow to help the water evaporate more quickly. You can also use a pencil to gently poke some air holes into the growing medium to provide extra aeration and oxygen to the roots.
For soil grows, you generally only want to water the plant when the soil feels dry if you press a finger in it. You can also use the "lift the pot" method to decide when to water your plants (basically wait until your pot feels "light" since the plants have used up all the water). For other growing mediums besides soil, your watering method will vary, but if your plants are drooping and you've been feeding them a lot of water, it's a good idea to cut back and see if that helps.
If you're growing hydroponically with your marijuana roots directly in water and you see the signs of overwatering, that means you have a problem at your roots. Either your plants have root rot which is preventing them from getting oxygen at their roots, or you are not dissolving enough oxygen into the water (you can easily increase the dissolved oxygen in your water with a quality air pump and a few air stones).
12
Problem: Phosphorus aids in root growth and overall health of the plant and is especially essential when the plant is in flowering. Cannabis loves phosphorus and it is very unlikely that cannabis gets too much phosphorus. A plant which is deficient in phosphorus will have slow, stunted growth. If there is a major deficiency, the leaves may exhibit dark gray or purplish splotches. The last picture below is an info-graphic with more information about phosphorus and your marijuana plant.
Solution: Check the pH and flush system. An excess of Fe and Zn may cause a phosphorus deficiency. If you've tried everything else, then you may try adding a bit more phosphorus to your feeding schedule and see if that helps clear up the problem. Cannabis plants love phosphorus, and therefore it is unlikely that you will give your cannabis too much phosphorus.
Advertisement
http://www.thenug.com/api/outbound?target=https://www.vapir.com/
13
Problem: Older leaves turn yellow then start getting dark, scorched lesions around the edges of the leaves. Plants may stretch and stems may become weak. The symptoms are very similar to an iron deficiency except the tips of the leaves curl as the edges burn and die. The last picture below has some more information about the potassium requirements of your marijuana plant.
Solution: Potassium isn't absorbed properly when there is too much calcium or nitrogen in the system. Check the pH of your water, and flush your whole system with water that contains half the normal amount of nutrients and see if your plant starts showing signs of improvement.
14
Problem: Roots need water, but if they are exposed to water with bacteria they will start to rot. Roots that have been drowning in too much water without enough available oxygen are much more susceptable to problems. Healthy roots are white to cream-colored while roots affected by root rot are brownish and actually smell like they're rotting. Plants affected by root rot will spontaneously start losing their leaves, yellowing, drooping, and otherwise look like they're dying. You will also notice that affected plants will start drinking less water. If you notice these symptoms in your plant, then it can't hurt to try all the suggestions for stopping root rot.
It's important to notes that root damage is permanent. A recovering plant will be able to make new growth, but it's old infected roots will likely never recover. Root rot mostly affects hydroponic systems, but can also result from over watering your plants in soil or other medium. Basically anytime the roots are sitting in water, they are at risk of devloping root rot.
- Plants may appear overwatered or droopy
- Brown, slimey, smelly roots
- Plant leaves often start turning yellow
- Leaves start dying and falling off rapidly
- Plants drink much less water than usual
Solution: It can be tough to get rid of root rot and many people feel it's easier to just scrap the plant and start over. However, there are proven techniques that will cure your plant of root rot problems. In order to get rid of root rot successfully, you need to take a two pronged approach. You will need to treat the plant's root directly and you will also need change the plant's environment so that root rot no longer has a good place to grow.If you don't fix the environmental causes of root rot, then it will just keep coming back no matter what you do. Therefore, it's important to go through the below list and make sure you're covering all your bases to prevent a re-occurrence. It's also important to note that affected roots will likely never recover, just like how discolored leaves on the plant will never recover. What you're looking for is new, healthy white root growth.
Aquashield is also much cheaper than most other similar root treatments,
In addition to treating root rot, Aquashield also works as a preventative, even in hot, unclean reservoirs. Since I first started using Aquashield in DWC, bubbleponics, and other hydroponics, it has successfully preventing me from getting root rot as long as I keep using it. I also use it when growing in soil if I suspect root problems.
How to prevent and treat root rot:
- You will need to keep your grow area as clean as possible at all times to stop bacteria before it starts. Before you begin your grow, you should also thoroughly clean all grow-related items with white vinegar and water to kill all bacteria.
- Some people like to add beneficial bacteria to their water to help prevent and treat root-related plant diseases and help make nutrients available to the plant. Some of the formulas available are Piranha, Aquashield, VooDoo Juice, Great White (Great White hasgreat reviews, yet is obscenely expensive), Subculture B, Rooters, and Plant Savers. Most of these can be used with both hydro and soil grows. I personally recommend Aquashield because I've used it successfully to treat Root Rot (and by 'successul' I mean new white roots exploded out of the old mushy brown ones and I was able to eventually harvest the buds).
- If you have a hydroponic system, it's best to change your reservoir water regularly in order to prevent any one type of bacteria from overgrowing the whole reservoir. I personally recommend trying to change your water at least once a week. Regularly changing your water will also help your plants get better access to nutrients and the roots of the plant love that 10-15 minutes where they get access to the oxygen in the air (just don't ever let the roots get dry).
- It is beneficial to try to get as much oxygen as possible dissolved in your water. Therefore it's a good idea to buy a BIG air pump and big air stones for your hydroponic system. Root rot cannot thrive in an oxygen rich environment and your plant's roots love it.
- Ensure that the temperature of the water never gets warmer than a comfortable room temperature. Warm water holds much less dissolved oxygen than colder water and also provides the perfect environment for bacteria to grow. The maximum recommended temperature for the water in your reservoir is around 72°F (22°C). Trying to maintain water temps around 65°F - 68°F (18°C - 20°C) seems to be optimal for both plant growth and root rot prevention.
- In a hydroponic system, ensure that any dead roots, dead leaves or other types of plant debris doesn't get into the reservoir because they will provide a breeding ground for bad bacteria as they start rotting.
- Don't let any light get to your roots or reservoir water ever, as it provides heat and light which will promote the growth of bacteria.
- SM-90 is another supplement that some growers use to prevent and treat root rot, as well as help your plant's overall root health. It's made up of a few different types of oils that happen to kill many pathogens as well as make nutrients more available to your plant's roots. I also like to have SM-90 around because it will kill aphids, spider mites, and white powdery mold when used as a foliar spray. I personally feel that anyone who grows marijuana should have some SM-90 around. I've heard that SM-90 will kill beneficial bacteria, so I don't use it if I'm adding Aquashield. I always use one or the other.
- Some people recommend treating root rot with H2O2, also known as hydrogen peroxide. While adding hydrogen peroxide to your water will kill all bacteria including root rot, it is only effective in your system for 1-2 days since the H2O2 is quickly converted to oxygen and water. Therefore, if you use hydrogen peroxide as a treatment for root rot, you will need to treat your water daily to prevent re-occurances. If you want to kill all the bacteria in your water, I personally recommend getting SM-90 instead because it will remain effective in your water for at least a week. If you want to encourage good bacteria to grow, then don't either use SM-90 or hydrogen peroxide and get Aquashield instead.
Problem: A sulfur deficiency will manifest itself as all-over chlorosis (yellowing of leaves) starting with the oldest leaves and may look like a nitrogen deficiency at first. The parts that are underneath the leaves may take on a distinctive pinkish red or orange color. The buds on a flowering plant may start dying off. Unlike other deficiencies that cause chlorosis, a sulfur deficiency will start at the back of the leaf and move it's way forward as opposed to started at the tips. Leaves become stiff and brittle and will eventually fall off.
Solution: Check and correct your pH to make sure that your sulfur isn't being locked out. Sulfur moves slowly through the plant so it may take a few days after you fix the problem before you start noticing an improvement in your plant.
http://www.thenug.com/api/outbound?target=http://www.nakednews.com/?nnid=iag64868
16
Problem: If your plant is drooping and you're sure you haven't overwatered it, than it might need more water. If you've been underwatering your plant, its leaves will look limp and lifeless.
Solution: While it can be good to let your plant dry out a bit after watering, you should always water the plant again before it's leaves start drooping. A good way to tell if a potted plant is ready to be watered is to pick it up and tell if it feels heavy or not. As plants use up all the water in their pot, it will start to get lighter. If you need something for comparison, you can get an extra pot and fill it with your growing medium. Now you can use this extra container for comparison with your potted plants as it represents the 'dry weight' of your growing medium. If you pick up a potted plant and its feels just slightly heavier than your dry pot, then you know it's time to water your plant. After a while you get a feel for how heavy your plants need to be and you may not even need the extra pot anymore.
Click here to see a time-lapse of an under-watered marijuana plant coming back to life.
17
Problem: Younger leaves start yellowing in between the veins. Leaf tips get discolored and start dying. the leaves will take a unique banded appearance and the plant will stop growing vertically. There will be much less space between new nodes which will cause all the new leaves to start bunching together. If the plant is budding, it's flowers may start dying.
Solution: Flush your system with clean, pH'd water that contains about half the nutrients needed for the plant (including zinc, iron, and manganese). Watch to make sure that the problem starts to clear up on new growth within a couple of days.
Last edited by a moderator: