- Joined
- Dec 25, 2017
- Messages
- 200
- Reputation
- 0
- Reaction score
- 795
- Points
- 0
- Currently Smoking
- All things good.
Another diy project of mine.
 Price varies if you order your carbon online in bulk or not. Materials I used. 12'' long 3'' round pvc pipe $3, 2 1/2 quart painters pail with lid $2.50, roughly a 3 in strainer $1, a bag of cotton balls $1, 10lb bag of activated carbon from ebay for $18, electric tape $1, and a few dryer sheets free unless you don't have any lol.
 Filling is temporary until my carbon comes in but the build is complete. It's really easy to make really no tools needed other than a knife to stab and cut holes with. I took my piece of pvc pipe and taped the strainer to one end to hold the pipe up off the bottom of the bucket.
 Then I cut a hole in the middle of the lid smaller than the pvc but to where I can force it through. Then stabbed a bunch of holes around the outside of the bucket close to the top and also around the rest of the lid.
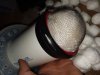
 I put the pvc pipe in the bucket and filled the extra outside space up with the cotton balls and the few dryer sheets.

 Then i filled up the pvc pipe with a letter of cotton balls, then 1lb activated carbon from petsmart, and then more cotton balls.

 Force the lid on and hook it up to your exhaust fan and your Good to grow.

I call it a two stage filter lol. Air flows out the exhaust into the pvc pipe through the carbon and cotton balls and into the bottom of the bucket....(first stage) it's then pushed back to the top of the bucket through the rest of the cotton balls, carbon, and dryer sheets where it's finally exhausted out of the vents...... (stage two).
@Free Flow here it is.